Archive | I love food RSS feed for this section

Cocklebur Junction Butter Dumplings

3 Nov

After I type that I’ve decided it could be a new nickname for someone in my life. I already have my butter bean Bailey and my lucky ducky Dally. The kiddos have an Aunt Boo and an Uncle Hitch. I’m feeling really Southern and sentimental, so I guess a good name for the Cowboy would be Butter Dumplings.

I’m going to guess that he’s not going to like that too much.

But I have swayed him over my side when it comes to eating Chicken and Butter Dumplings.

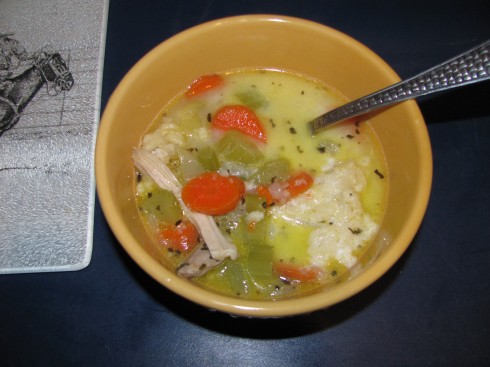
It’s not your traditional country-style Chicken and Dumplings, which can be made out of anything, even just flour and water. Butter Dumplings are light and fluffy, floating in a well-seasoned Chicken soup. I’ve never seen anything like them out there. I adore them. Nothing heavy, but packed with a ton of flavor. The original recipe comes from Mark Bittman’s How to Cook Everything, which ranks right up there with Joy of Cooking for me. But of course, I’ve tweaked the recipe to make it my own.

You start with your Chicken stock. I generally don’t add my meat back into the soup until the dumplings are finished. For 4 servings, you need approximately 6 cups of chicken stock. Heat the stock until it is gently simmering.

I take 4 Tablespoons of butter and put it in the microwave for a few seconds on low until it is softened. If you have more foresight than I do, just set it on your counter for a while to soften. The idea is that the butter is nice and creamy soft.

Take the back of your fork and cream the butter until there are no lumps in it at all. Beat 2 eggs into the butter. Get it all nice and smooth.

Grate…and yes, I said grate, as in with a grater….an onion until you have 1/4 cup of grated onion.

You are probably going to cry a bit. It can be torture. That’s why there are no pictures of this process. Tears were running down my face from the ultra strong onion I was trying to grate.

Just keep saying “Butter dumplings, butter dumplings, butter dumplings.”

Add the onion to the butter and eggs. Stir in 1/2 cup flour and a pinch of salt and pepper.

Stir until well blended. You want a soft batter. You can stir in a Tablespoon of heated stock if you need. The consistency is like a muffin batter, a little thicker than a pourable cake batter, but much looser than a biscuit dough.

Drop about a teaspoon of batter into the stock at a time. Cook until set and cooked through. This is impossible to tell. I hate how cookbooks say that. Give it 10 minutes. They should be done. Take one out and blow on it, blow on it, try it. Try not to curse in front of the kiddos when you burn your mouth. Wait a few more seconds. Try it again. Decide it was worth burning your mouth.

Taste your soup and see if you like the seasonings. Add more salt or pepper, if needed. I often add about 1/2 cup of milk — it adds a creaminess that actually boosts the flavors. Or if the kiddos are really so ready to eat they can’t handle it any longer, I just dish the soup up and add the cold milk to each of their bowls. This cools the soup down quickly. Enjoy!

The never fail Chicken everything recipe…..

2 Nov

There is something about the crispness of cool fall days that forces me to make Chicken Soup, Chicken and Rice, Chicken and Noodles, Chicken and Dumplings….the list goes on and on. I think it’s the whole idea of having something yummy simmering on the stove.

It’s so simple and quick. I can do it in my sleep.

The key to making any good “chicken and…” recipe is starting out with lots of flavor. You can use this basic process to start any great chicken soup.

You need to gather onion, celery, carrots, garlic, bay leaves, basil, salt and pepper. This combination will create the flavor that drives your dish.

Chop the onion, celery and carrots. (I used one onion, four celery stalks and three carrots.)  Hang onto the garlic, we’ll use it in just a bit. Your cutting doesn’t have to be pretty. It can be chunky. It can be not chunky. Whatever you like. I like fairly large chunks that aren’t very uniform. I call it “rustic.” Which is a french word for “lazy.”

Take a large stock pot, heavy bottom pot or dutch oven and put it over medium heat. Add a generous amount of butter. I’d say I have two Tablespoons here.

You can also use olive oil or just plain vegetable oil. I’m just a butter sort of girl. If I have fewer than eight sticks of real cream butter in my fridge, I start to panic.

Add the vegetables and season with salt, pepper and basil. This isn’t the finished flavoring for your dish, but you need to add a bit of salt in order to draw the flavor juices out of the onions and celery. The basil and pepper helps to add a layer of flavor. Believe me, the carrots are going to soak up the flavor. If you are a stickler for measurements, I added about two Tablespoons of salt, a Tablespoon of basil and a teaspoon of freshly ground pepper.

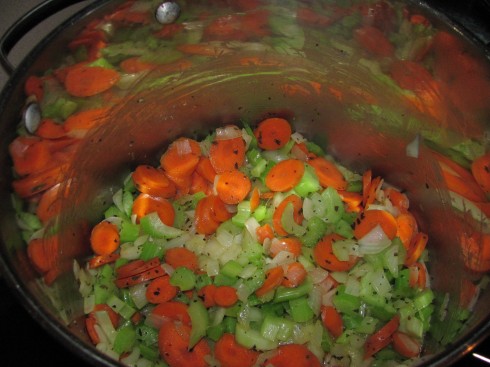
Stir it all together and let it cook until the onions are tender. Give it a quick stir every few minutes so that all the vegetables have their turn in the hot seat.

This is what it looks like when the veg’s are getting tender. The smell will be amazing. People will start wondering in the kitchen just to see what you are doing. Small children will stand there and look up at you with big eyes until you give them a cookie to go away!

Place chicken thighs on top of the vegetables. I used five. I could have used three. I probably could have used seven. But five seemed to be the right amount for me. Just make a decision and go with it. In my opinion, a lot of cooking relies on gut instinct. Thighs give the most flavor to chicken soup. I use thighs and legs as a base for all my chicken stock.

Realize at this point that you should have washed the dishes in the sink before beginning this process. Because now you are left with a hot pot full of food and need to get water in it. So take a few minutes to dig around and find a pitcher. Fill it with water and pour water over the chicken until it covers the chicken by about 2 to 3 inches.

`

Throw in two bay leaves and add your garlic. If you are making the same amount of soup I am here, you will need approximately two of the larger cloves from the outside of the bulb. Do not use five like I have pictured here. Unless you are sick and really need the garlic to work homeopathic wonders on you. I have a cold. That’s why I used so much garlic. That, and I got carried away. Sometimes, that happens.

Put a lid on the pot and let it gently simmer. Don’t full boil it, just find a spot where things are nice and gently bubbly. The amount of time it takes to cook the chicken will vary depending on how much chicken, the size of the pot, the size of the chicken and etc. For these thighs, we are talking less than an hour. A full chicken would take approximately an hour.  Use a meat thermometer to check the chicken to see if it’s done, if you are worried about it. The temperature should be at 170 degrees F.

Remove the chicken and garlic from the pot and set it aside to cool. If you really love garlic, you can take the bulb of garlic and gently squeeze it over the pot. The inside of the garlic will come out as a soft paste. Stir this into the stock. Yummy.

Now remove the chicken from the bones. This is messy, it is slimy and it will get under your fingernails. I will guarantee that you will be right in the middle of it when your children need something very badly, your nose itches or the phone rings. It is just how the universe works.

Put your chicken to the side as you decide what to make with your chicken stock.

At this point, you have a lot of options. You can freeze the chicken soup (stock) for use later and use the chicken for chicken salad.  Or go ahead and make a big pot of Chicken something….noodles, tortellini, alphabet-shaped pasta — the options are limitless! You can add rice to the stock and make chicken and rice. Just remember that white rice takes two cups liquid to one part rice. If you have two cups of stock and one cup of rice, you aren’t going to have any liquid left over. Make sense? If you have three cups stock and one cup rice, you will have a little liquid left. Six cups of stock and one cup of rice and you have a lot of soup for the rice to swim in. Keep in mind that noodles and pasta won’t soak up as much liquid, but they will still absorb some. Especially after the soup sits in the fridge overnight.

Once the rice, noodles or pasta are finished cooking, season the soup with salt and pepper. If you salt it prior to cooking the rice or pasta, you may end up with something way too salty. This is because the water evaporates or is absorbed. Less water, but the same amount of salt, equals too salty.

Now add the de-boned chicken back to the pot and enjoy!

My favorite thing to make is Chicken with Butter Dumplings. I’ll share the recipe with you tomorrow. It is a wonderful twist on dumplings that is quick, easy and not messy!

And it adds butter. Everything is better with butter.

Never too late for Christmas cookies!

3 Jan

Because of being stuck in a snowstorm and missing Christmas morning at home as a family, I guess things have just felt a little off. So yesterday, we went ahead and made our Christmas cookies!

We were either a little late, or really early. Hey, with a cookie, it doesn’t matter.

So I mixed up a yummy sugar cookie dough that simply rocked our world. It was by far the best sugar cookie I’ve ever made. The cookies were easy to move and held their shape extremely well. The original recipe was from Taste of Home magazine, but I (as always) changed things as I went along.

Here’s my recipe:

Cocklebur Junction Sugar Cookies

  • 1 cup butter, softened
  • 3 oz. cream cheese, softened
  • 1 cup sugar
  • 1 egg yolk
  • 1/2 tsp. vanilla
  • 1/2 tsp. coconut extract (opt., but soooo good)
  • 2 1/4 c all-purpose flour
  • 1/2 tsp. salt
  • 1/4 tsp baking soda

In a large bowl, cream your butter, cream cheese and sugar with a mixer until light and fluffy. Add the egg yolks, vanilla and coconut extract and mix well. In another bowl, mix together your flour, salt and baking soda. Get it mixed up well. A whisk is great for this. Then gradually add it into the creamed mixture and mix well.

It will be crumbly. I laid out a piece of plastic wrap (or you can use waxed paper) and I poured my dough in the middle, wrapped it up and squished it together a bit. Then I put it in the fridge. Chill it for at least three hours. I left mine in overnight.

Now, here’s my tip for a mess free dough rolling experience. I put out a large sheet of waxed paper or plastic wrap. I broke off a chunk of my cookie dough. It was really cold and hard, so I had to let it warm up just a little bit. At least until I could kinda push a finger into it a bit. Then I put a piece of plastic wrap on top and I roll it out to the desired thickness. Peel off the top piece of plastic wrap and you have perfectly smooth cookies without using extra flour on them.

I rolled this dough to about 1/4 inch thick. Then I cut my cookies and put them on a ungreased cookie sheet with about 1 inch in between them. Bake at 375 for 8 to 10 minutes or until edges begin to brown. Let cool a few minutes then move to a wire rack to cool.

Now I liked them fine without any icing, but let me tell you that a little buttercream frosting on top of these really made them decadent (and probably doubled the calorie content).

Because things are crazy busy around here, we used frosting from a can. I piped it onto some of the cookies using a star tip and then some of the cookies just got a quick swipe of frosting with a butter knife.

Then it was the girls turn to work on them a bit.

I was shocked at how well behaved the girls were during the decorating part. There were no arguments. No cookies eaten on the sly. No temper tantrums or big messes. I don’t know what got into them. But I am tempted to make Christmas cookies more often.

I’m not quite sure how the icing got on her face, but Bailey was all about the decorating. And I thought she’d be more interested in eating!

All in all, the cookies turned out great. When we were finished, the girls worked out a system that was rather…um, gross. Dally would lick the icing off and then Bailey would eat the cookie. What can you do? Ewww.

Peach Butter…the reason I have to do aerobics

9 Dec

I am flat out addicted to butters, jams, spreads and anything else that contains half a bag of sugar. I joke about Oreos helping me to beat my “mommy stress”. But the honest truth is that I sometimes can’t wait to get the kiddos to bed and pop some homemade bread in the toaster, just to spread it with real butter and homemade preserves.

Heaven.

If I do that while the kiddos are awake, they can hear the toaster and come running. Even if I sneak it to my closet and close the door….

While I’ve eaten all but one jar of the preserves I’ve but up this summer, I am seriously contemplating taking some frozen fruit from the store and making some more homemade peach butter…..

Here’s the recipe:

Cocklebur Junction Peach Butter — four pint jars

  • 4 1/2 lbs. peaches, peeled, pitted and coarsely chopped
  • 1/2 cup water
  • grated zest and juice of 1 lemon
  • 4 cups granulated sugar

I usually make this when peaches are in season — and therefore cheap and juicy. To peel your peaches, simply put them in boiling water for a few minutes, then transfer to a icey bowl of water. Let them cool for a few minutes, then slip the skins right off of them. This is messy. It’s slimy. And you’re going to smell like peaches. But soooo worth it. Be careful cutting up the slippery peaches.

In a large stainless steel pot, combine your peaches, water, zest and lemon juice. Bring to a boil over medium-high heat. Reduce heat and let boil gently, stirring every once in a while, until the peaches are tender. That takes about 20 minutes. Use the in-between time to prepare you canner, jars and lids.

Transfer the peaches to a food processor and puree until it is all smooth. I do this in a few small batches, dumping the smooth peaches into another clean, large pot.

Now add your sugar to the peach puree. Stir well with a really long spoon. Bring the peach mix to a boil over medium-high heat. Never stop stirring. I mean this. Put the phone next to you on the counter. Make sure the kiddos are in bed. NEVER stop stirring. You will get hot. You will get tired. But you will stir.

You are going to stir your arm off. Last time I did this it took over an hour. It all depends on the weather, humidity and a lot of other factors. A few months ago, I had to stop for an emergency in the middle of it, so I turned off the burner. Dealt with the kiddo involved. And then came back and started back up again. It worked out fine. Remember, sugar burns very easily. And once it’s scorched — it’s scorched.  Just know that you are going to be there for a while.

Your peach butter will be done when it begins to hold its shape on a spoon. Okay, that means nothing to me. So here’s how I check it. Put a plate in the freezer. I use a large dinner plate, because I will test and test and test due to lack of patience. To test, you simply spoon a little peach butter onto the plate. When the liquid does not separate and create a ring of liquid around the butter, you are ready to can! It won’t have the exact same consistency as apple butter, but it should be thick.

Ladle the hot butter into hot jars, leaving 1/4 of room at the top of the jar. Remove any air bubbles. Wipe the rim clean. Put the lid on and screw down the rim to fingertip tight.

Process the jars for 10 minutes in a boiling water bath with the lid on the canner. Then simply take the lid off, wait five minutes and remove the jars to cool.

Clean your pots and bake some biscuits, because I’m sure you are like me and can’t wait to try it out!

Word of warning….I’ve done this with the kiddos running around. That doesn’t work out so well. Sugar burns horribly. Everything you deal with is boiling. I’ve canned every year without incident, but this year there was a small incident. And only one incident can scar a child for life. In order to save Bailey from a boiling water spill, I ended up with a nice scar on my arm. So it’s better to wait for the kiddos to go to bed or out to do chores with dad before starting this.

I think I’ll see how much it costs to buy that many frozen peaches. Hmmmm….if I try it, I’ll post pictures and let you know how it works out.

Fluffy biscuits on a cold winter morning

8 Dec

I many not be able to make gravy, but I can make biscuits.

But if you ask the cowboy, he will tell you that I’ve made millions of biscuits that taste great, but look like cookies.

You see, I have to try every single recipe known to mankind before I settle on a recipe I like. And frankly, some of those recipes out there really aren’t all that great. The year I decided to learn to make the perfect cookies was a big hit around here.

The perfect salsa….well, we spent a lot on antacids that summer.

But nothing is better on a cold, dreary morning than hot fluffy biscuits and some homemade peach butter.

So, here is my favorite, can’t-go-wrong, biscuit recipe.

Cocklebur Junction Angel Biscuits

  • 1 package dry yeast (or 2 1/4 tsp. bulk yeast)
  • 5-6 c. flour
  • 1 tsp baking powder
  • 1 tsp salt
  • 1 tsp soda
  • 3 Tbsp sugar
  • 2 c. buttermilk
  • 2 Tbsp warm water
  • 1 c. shortening

Simply dissolve the yeast in the warm water. Put all the dry ingredients in a large bowl (I start with five cups of flour) and swirl them around with a whisk. Cut in the shortening until you have small crumbs. Add the buttermilk and yeast to the flour mix. Knead a few times til it comes together. If you need more flour, this is where you add it in.

Pat out on a floured surface. If you like really tall biscuits, don’t flatten it out too much. I usually pat it down to about 1 inch. I never use a rolling pin on my biscuits because I have the idea that I need to be gently with them. Then either cut into squares with a sharp knife or use a round biscuit cutter. You can even use an empty tin can in a pinch (um, flour it first). I brush them with a little melted butter sometimes, but it isn’t necessary. Put the biscuits in a greased pan and bake at 400 degrees until brown on top. That usually takes about 15-20 minutes. But don’t quote me on that. I’ve never timed them. Yours may be thicker or thinner than mine…. Um, if you see smoke, you’ve waited too long.

Or just skip all the rolling and shape a few with your hands to make drop biscuits.

This recipe will make two 9X13 pans of biscuits. Now that’s too much four our little family to eat. So here’s the best part of this recipe….you can take the dough, put it in a baggy, stick it in the fridge and use it as you need it during the week. Ahhh, so quick and simple on a crazy morning.

And our mornings are crazy…so I make it up the night before and pull it out in the morning. By the time I get done with morning chores, hot and fluffy biscuits are waiting for cold, homemade peach butter. I’ve already mixed it all up for tomorrow morning.

And I never have to even buy buttermilk for the recipe. Because I’ve discovered powdered buttermilk. It lives in the cooking aisle at the grocery store and comes to live in my icebox. Simply stir in the powdered buttermilk (1/4 c. powder per cup called for in recipe — 1/2 c. powder for this recipe) in with your dry ingredients. Then add two cups of water when you should add the buttermilk. This eliminates the how-in-the-heck am I going to use the rest of this buttermilk question.

I’m not a morning person, but when I am eating these and looking out the window at a beautiful winter day, it all seems a little bit more manageable. That’s a little crazy. But I do love good food….

And a beautiful new day to start all over again.